Showing posts with label Tutorials. Show all posts

How To Get Found in Real Time Searches

· 0 comments

Real Time Searches is getting more and more popular on the web. You surely do not get relevant result, but you get up to date and time result. People who look for current events prefer to make real time searches than to Google it. Users usually follow their own communities and make a real time searches for their current event information.

Here are few tips to get found in Real Time Searches:

1. Keyword must be in your Title:
If you are writing an article, and if you have a little idea about SEO, you must be knwoing that you should enter your main keyword at least 2 to 3 times in your content. However to get your article found in real time searches, you must enter it in your Article Title as well. This is because, users only digg or tweet(or any other social networking sites) the title of the article in their updates. So it is very important to put your keyword in the Title of the article.

2. Contents relavent to current events:
Most of the time people make real time searches for finding information on current events. Meaning events that happened a day or week or couple of months a go. Even the events happening couple of days ahead. So you should not write about the World War II and expect your article to appear in real time searches. Because no one is going to even search for your article topic. Also you should consider writing some interesting topic, and not just about anything happening around. Of course you do not wish to bore your visitors.

3. Include Digg, Retweet Buttons on articles:
This looks a very simple thing but it brings a lot of popularity magically. This is just another tempting method for your visitors to digg or retweet your articles again. This way your article gets even more popular. And the more diggs or retweets you get the better are the chances for your articles to appear for real time searches.

Just to remember this is just about getting your website or blog found in real time searches. For the long term results to appear in Google, you should follow organic SEO methods. As real time searches is not about relavence but about the visibility of your articles in real time.

Bookmark this post:
StumpleUpon Ma.gnolia DiggIt! Del.icio.us Blinklist Yahoo Furl Technorati Simpy Spurl Reddit Google

Why You Should Place Popular Social Networking Site's Buttons on Your Blog

· 0 comments

More and more users are looking for live contents these days. They are making real time searches. Not to miss out an opportunity on this, even Google has started "Recent Results" in it's advanced search parameters. However as far as Google is concerned, no one has an accurate idea that when exactly it's updated.

So there are users, and the number of users is very high who use Twitter and Facebook's "Recently rolled it out". Although they cannot be a replacement of Google, they are useful for up-to-the-minute search results, i.e. Real Time Search. It has been noted that, the first thing these users do in the morning is not checking their emails, but going to Twitter or Facebook and check for the recent updates.

This is why it is necessary to place all popular social networking site's buttons below or above every posts of your blog. This way, your posts are just a single click away to be shared on most popular social networking sites.

I'd like to mention one obvious thing here, that the content you post on your blog must be revellent and sort of useful to all the users. Only then your posts are going to get more tweets, dugs etc. It is not about what is happening in real time, it is about what people are talking in real time. So you should post contents which users may wish to share with others.

Bookmark this post:
StumpleUpon Ma.gnolia DiggIt! Del.icio.us Blinklist Yahoo Furl Technorati Simpy Spurl Reddit Google

How To Disable 'Send Error Report to Microsoft' Message

· 0 comments

It is quite annoying to deal with "Send Error Report to Microsoft" message every time an application crashes. The same dialog box appears even when the operating system recovers itself from some serious/critical errors.

Sending error reports is one of the most important things you can do for the health of your computer. The more error reports Microsoft receives for a particular problem, the more likely it is the problem will be fixed. However, if you've got a problem that keeps appearing and you'd rather get rid of this error message appearing, you can turn off error reporting so it doesn't prompt you anymore by following simple steps given below.

How to Disable Error Reporting:

  • Click Start, right-click My Computer, and then click Properties.
  • On the Advanced tab, click Error Reporting.
  • Click Disable error reporting and clear the But notify me when critical errors occur check box, as shown in Figure.

Bookmark this post:
StumpleUpon Ma.gnolia DiggIt! Del.icio.us Blinklist Yahoo Furl Technorati Simpy Spurl Reddit Google

How To Reduce "Temporary Internet Files" Folder's Space

· 0 comments

Temporary Internet Files clutter your hard drive with copies of each page visited. Files can build up over time and take up lot of disk space. Even more bothersome is that, IE (Internet Explorer) often takes a page out of the Temporary Internet Files, instead of getting new pages each time. This can be a problem if you are viewing a website that is updated all the time.

This can be good if you are on a slow connection such as a 56K or lower. But if you are on a fast broadband connection, then you can easily reduce the size of your Temporary Internet Files to just 1MB without affecting overall performance.

Here's how to reduce "Temporary Internet Files" folder's space:

  • Launch Internet Explorer
  • Select the Tools from the menu bar
  • Then select Internet Options (from the drop down menu)
  • Once the internet options has loaded click on the general tab
  • Under the temporary internet files section click the settings button
  • A settings window will load. Slide the slider all the way to the left so the size indicated in the text box on the right is 1
  • Click OK.

Bookmark this post:
StumpleUpon Ma.gnolia DiggIt! Del.icio.us Blinklist Yahoo Furl Technorati Simpy Spurl Reddit Google

Run SkyPe from Your USB Flash Drive

· 0 comments

Skype provides a great interface to chat with friends (Voice chat & Video Chat), and make cheap phone calls as well. The application needs to be installed in your desktop computer or laptop. That means you can access Skype account only from your computer. But now, you can use it on the go or from wherever you are. You can actually make Skype portable by running it from your USB Flash Drive.

Mark from MakeUseOf, explains it with very simple instructions. Skype doesn't officially offer a portable version of their app, but by moving the application to your flash drive/thumb drive and creating a data folder for Skype on that drive with a few simple tweaks, Skype runs smoothly and in portable style.

Bookmark this post:
StumpleUpon Ma.gnolia DiggIt! Del.icio.us Blinklist Yahoo Furl Technorati Simpy Spurl Reddit Google

Add "PWN" to URL and Start Downloading YouTube Videos

· 0 comments

This seems to be the simplest of all methods to download YouTube videos. All you have to do is to just add "PWN" in the URL of the Video and you can download the full video onto your computer.

You do not need any software, copy/paste etc. You can download YouTube videos for fair right use.


How to download from YouTube.com:
  • View a video on YouTube.
  • In the URL location box, type pwn in front of youtube, and enter.
  • Get links to download the video!

Example:
How to download videos from youtube


Bookmarklet: PwnYouTube

Drag this link to your links toolbar and click it
when you are viewing a video on YouTube.

Credit: PWN YouTube

Bookmark this post:
StumpleUpon Ma.gnolia DiggIt! Del.icio.us Blinklist Yahoo Furl Technorati Simpy Spurl Reddit Google

How To Download Unlimited from Rapidshare Without Waiting

· 0 comments

This guide is only for free Rapidshare Account users. Do not go away even if you know how to generate Premium Rapidshare links. You might have limitations on generating rapidshare premium links per day. But here, you won't have limitations on generating premium links with the website I'm going to talk about.

Search RS is just another site which generates 'n' number of premium links for you per day. The only downside is, it stores your files only for 60 minutes. That means you have to download your premium links generated, within 60 mins. But you do not have to wait to generate a premium link and can download immediately. You can also use your download accelerator or download manager. Note that, it doesn't support "Resume" (Not Checked with Each Download Manager).

Just visit the website, enter you rapidshare link/links, enter captcha, and click download, you'll get premium link/links to download on your next screen. That's it.

Bookmark this post:
StumpleUpon Ma.gnolia DiggIt! Del.icio.us Blinklist Yahoo Furl Technorati Simpy Spurl Reddit Google

Dual Boot Windows 7 with XP or Vista

· 0 comments

Have you ever used Dual Operating Systems on your computer? It simply means that there are two operating systems installed in your computer and you can choose any one of them to operate on at a time. People have used Windows XP and Windows ME, Windows Server 2000 and Windows 98 SE together. Many advanced programmers use Windows OS with Linux/Unix as well.

It gives a comfort on which level you wish to perform you task. If you have Windows 2000 with Win 98, and you only wish to get a print-out of one of your office documents, using Win-98 would be easy instead of loading heavy Windows 2000 Server.

Anyways, here is one more benefit of using Dual Operating Systems. Since Windows 7 is publicly released now, you can Dual Boot Windows 7 with XP/Vista in order to check it's features, it's comfort level as well as it's overall performance. So that anytime you require you can switch back to your primary Operating System.

I came across with a very good tutorial at TechSpot. Which shows you how to just do it in 3 easy steps. Click a link below to viiew step by step instructions.

Bookmark this post:
StumpleUpon Ma.gnolia DiggIt! Del.icio.us Blinklist Yahoo Furl Technorati Simpy Spurl Reddit Google

Provide a Short Summary of Your Contents to eMail Subscribers

· 0 comments

Lot of Blogging is going around these days. Everyone is sharing their unique views, knowledge and update news on their blogs. People subscribe to their email subscription to receive these details directly to their email address. If you are a Blogger and have a long list of people subscribed to your blog, you can tweak your subscription to increase your site's traffic. By providing just a small summary of all posts in a single email.

This way, people may find one of your posts interesting and click on it to read in full at your blog. It is very easy to activate this feature. Follow the steps given below.

Sign in to your feedburner account and move on to Optimize tab.
Now look for Summary Burner under Optimize tab and click on it.
When you open Summary Burner, you can set maximum length of characters and you can also paste a teaser. After this click on Activate to activate this feature.
Now your subscribers will receive updates as a Short Summary of your posts.

Bookmark this post:
StumpleUpon Ma.gnolia DiggIt! Del.icio.us Blinklist Yahoo Furl Technorati Simpy Spurl Reddit Google

Why GMail is Different Than Other eMail Services?

· 0 comments

Many people who use GMail find some of it's features different and unable to understand it. May be because they have old traditional eMail accessing habit. You don't find Folders (To Move an eMail from inbox to a specific folder) option, instead GMail uses Labels. GMail uses Archive to simply remove and not delete an eMail from Inbox. To make labelling automatic that sorts your incoming messages, you can use Filters in GMail. gravi_t, explains all the features in a great manner, that make Gmail different. gravi_t has written this knol here.

Labels Vs. Folders:

There are no folders in Gmail, there are labels instead. Labels are better than folders, because they save up space in your account. How? Lets say, you have one email that you want in 3 or 4 different folders. All other email services would make 3 to 4 different copies of the same email and save it in 3 to 4 different folders. But Gmail simply applies 3 to 4 Labels to the same email.

  • Each email is a piece of paper
  • Labels are post-it notes, sticky notes
  • There are default labels, like "Inbox", "Sent items", "Trash" ("Bin"), "Spam"
  • Yyou can also create labels (i.e. sticky notes)

This means that - unlike in other email services - you do not put the emails into folders. You actually attach labels to the emails.

To create labels:

  • Either open the "More options" drop-down list after you selected an email
  • Or go to Settings --> Labels, and type a name in the "Create a new label:" field.
  • You can see a list of all of your labels in the green labels box on the left.

Filters:

To make labelling automatic, you can set up filters to sort your incoming messages. Here is how to create filters:

  • Either click on the "Create filter" link at the top, to the right of the "Search the web" button
  • Or go to Settings --> Filters, and click on "Create a new filter" at the bottom

The headings on the left of your Gmail page (Inbox, Starred, Chats, Sent Mail, Drafts, All Mail, Spam and Bin) are also filters, preset by Gmail. When you click on them, Gmail gives you a filtered view of all your existing emails based on the name of the heading.

Archiving:

To "remove" an email from the Inbox:

If you want to remove a message from your inbox, DO NOT delete it! You can remove the "Inbox" label from an email - like you take a post-it note off a piece of paper. This is called archiving in Gmail. Select the email and click on "Archive". After this you can find it in All mail or under the label(s) you attached: just click on the name of the label in the green labels box on the left.

Just note that, you cannot remove the Sent mail label. This means that you cannot archive emails from Sent Mail.

Removing a Lable:

To "remove" an email from a label:

You actually remove a label from an email, and not an email from a label. Don't forget, labels are not folders. If you want to remove a label from an email, DO NOT delete the email!

  • Select the email
  • Use the "More actions" drop-down list to remove labels from emails

Deleting eMails:

ONLY emails in Trash and Spam are automatically deleted (after 30 days), all other emails will stay until you delete them (i.e. you put the Trash or Spam label on them). Note that you can also delete emails by accident with your filters, auto forwarding, POP settings or via an IMAP connection. And don't forget, you only have ONE actual copy of your email! If you delete it, it will be removed from all views (Inbox, labels, Sent Mail, All Mail).

Bookmark this post:
StumpleUpon Ma.gnolia DiggIt! Del.icio.us Blinklist Yahoo Furl Technorati Simpy Spurl Reddit Google

Confused on Creating a Strong Password?

· 0 comments

It is certain that you and everyone else are very much concerned about your security, and your wish to keep your password unbreakable. Most people keep their passwords relating to their personal information. That is strongly not recommended. But now you can, keep your passwords based on your personal information with the help of Password Bird.

Password Bird is one of the many online services which lets you create strong password by jumbling the personal information you give it. It takes your Name, favorite word, Date of birth and then creates a random password by taking prefix or suffix of them to give you a perfect password.

Here is an example:
Enter Your Personal Details and Press "Create Password!" Button.
It Generates First Suggestion, If You Don't Like It Click "Click here and I will make a new one!"
It Generates Another Suggestion, and So You Can Go On Until You Find The One You Can Remember Easily.

Bookmark this post:
StumpleUpon Ma.gnolia DiggIt! Del.icio.us Blinklist Yahoo Furl Technorati Simpy Spurl Reddit Google

Now Convert Your Blog Using Google Blog Converters

· 0 comments

Blogger earlier started to allow users to export/import all contents of their blog. Now you can even convert between your Blogger based Blog and WordPress, LiveJournal, MovableType. You can simply switch over from your current blog platform to another. This new Open Source project easily moves blog posts and comments from one service to another. In addition to this, the source code includes templates for hosting these conversions on Google App Engine.

Here are the direct access links for you to convert your blogs:

Kindly note, it accepts only 1MB file size.

To convert from Blogger to Wordpress you have to export the blog from blogger and import into blogger2wordpress.appspot.com. Same applies for all blogs.

Since it is an Open Source Project, You can Contribute to the project, so check out the source code (download, 2.7 MB zipped). You can also give your feedback in the discussion group.

Bookmark this post:
StumpleUpon Ma.gnolia DiggIt! Del.icio.us Blinklist Yahoo Furl Technorati Simpy Spurl Reddit Google

Install Ubuntu Without Partitioning Hard Disk

· 0 comments

It's a great news for all Windows users to try your hands on Ubuntu. Now you can install Ubuntu without interrupting your Windows Operating System, even without partitioning your Hard Disk. For starters, it is to be noted that Ubuntu is a computer operating system, that has consistently been rated among the most popular of the many Linux distributions.

It is perfect for laptops, desktops and servers. Whether you use it at home, at school or at work Ubuntu contains all the applications you'll ever need, from word processing and email applications, to web server software and programming tools.

Steps to install Ubuntu Without Partitioning Windows.

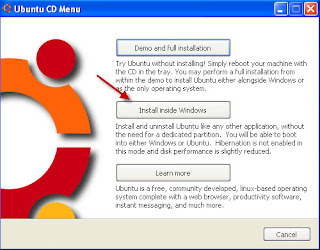
1. Insert your Ubuntu 8.10 CD and select install inside windows as shown below picture.
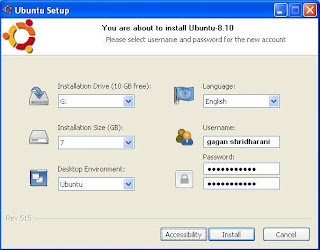
2. Now Ubuntu setup opens as show below picture .
3. Enter user name, password and select the drive for installation.

4. The image files will be copied to selected drive and while rebooting you can get new boot menu with both windows and Ubuntu.

5. To uninstall Ubuntu, boot into windows and go to add/remove programs in control panel, uninstall Ubuntu Os.

Note: If you have any other versions of Ubuntu, install it via wubi tool

Bookmark this post:
StumpleUpon Ma.gnolia DiggIt! Del.icio.us Blinklist Yahoo Furl Technorati Simpy Spurl Reddit Google

You Can Download Your Twitter Archive

· 0 comments

Twitter has been around on internet since long now. With a database reaching back to December 2007, one may require to download full Twitter Archive. This is now possible through TweetScan. Most people reviewed Twitter search engine TweetScan irrelevant after competitor Summize was acquired by Twitter. But today Pete Cashmore from Mashable, discovered a little-known (but long-standing) feature of the service that' incredibly useful.

You can easily download your Twitter archive at a page called TweetScan Data. The benifits, according to TweetScan are listed below:
  • Archive past exchanges
  • Publish links and quotes
  • Follow up on past projects
  • Access offline
  • View and reconnect with contacts
The only downside: like most Twitter apps, you need to enter your Twitter username and password to access the service. We consider TweetScan to be reputable, but there’s growing doubt about whether this is really the best means of Twitter authentication. Source


Bookmark this post:
StumpleUpon Ma.gnolia DiggIt! Del.icio.us Blinklist Yahoo Furl Technorati Simpy Spurl Reddit Google

Insert Smileys, Emoticons to Your Blogs, Social Communities & Forums

· 0 comments

Action speaks faster than Words. We all know that. Action is a very significant form of communication. And when it comes to communicate online through Blogs, Social Communities and Forums, Smileys and Emoticons are must and very helpful means of sharing your views. But how to insert them into your post?

Well, many addicted bloggers and regular communities or forum visitors must have found out how to do that, but believe me, it takes lot of your time to search for an appropriate smiley and than upload it on a free file hosting site and then, posting a link on your post. What if you just had your browser giving you all the list of smileys and you just click on it and you get the HTML Code to post in your forum.

Now you can do that if you are a Firefox user, using Smiley Xtra Add-On. No matter which platform you are using, whether it is Blogger blog or Wordpress blog, you can easily add emoticons to your blog posts using this Add-On. This Add-On will be very useful and more beneficial to the Blogger blog users since blogger users find very difficulty to add such emotions to their blog posts unlike Wordpress.

I strongly recommend you use version 4 of this Smiley Xtra, since version 5 contains more broken links.Clever

Bookmark this post:
StumpleUpon Ma.gnolia DiggIt! Del.icio.us Blinklist Yahoo Furl Technorati Simpy Spurl Reddit Google

SQLite Manager - Great Firefox Add-on, Manages all Your SQLite Databases

· 0 comments

You can Manage any SQLite database on your computer. Helpful dialogs to manage tables, indexes, views and triggers. You can browse and search the tables, as well as add, edit and delete the records. Facility to execute any sql query. A dropdown menu helps with the sql syntax thus making writing sql easier. Easy access to common operations through menu, toolbars, buttons and context-menu. Export tables/views in csv or xml format.

This lightweight extension for isn't only compatible with Firefox but, Thunderbird, Sunbird, Seamonkey, Songbird, Komodo, Flock as well. (See the complete list of supported applications) This extension will be very useful to developers who want to create and play with sqlite databases. SQLite Manager is available as a XULRunner Application too. The file with XR in its name is the zip of the XULRunner application.

Some Key Features are listed below:
  • Dialogs for creation, deletion of tables, indexes, views and triggers
  • Ability to rename, copy, reindex tables
  • Ability to add and drop columns
  • Create new db, open any existing db, copy an existing db
  • Supports writing your own queries (single or multiple)
  • Supports saving the queries with a name
  • A tab for database settings (no need to write the pragma statements) where you can view and Change the sqlite library settings
  • Export tables/views as csv, sql or xml files
  • Import tables from csv, sql or xml files
  • A dropdown menu showing all profile db (.sqlite)
  • An intuitive heirarchical tree showing all tables, indexes, views and triggers
  • Ability to see the master tables
  • Ability to see the temporary tables, indexes, views and triggers
  • Ability to browse data from any table/view
  • Dialogs to allow searching in a table/view
  • Allows editing and deleting selected record while browsing a table's data
  • Allows adding, saving and changing blob data
  • An extensive menu that helps with writing sql by hand and then executing it
  • Remembers the last used db, table and the tab (structure, browse & search, etc.) across sessions
SQLite is a small C library that implements a self-contained, embeddable, zero-configuration SQL database engine. An SQLite database is a single ordinary disk file that can be located anywhere in the directory hierarchy. Source


Bookmark this post:
StumpleUpon Ma.gnolia DiggIt! Del.icio.us Blinklist Yahoo Furl Technorati Simpy Spurl Reddit Google

Control Your Mouse Pointer Using KeyBoard

· 0 comments

If one fine day your mouse stops working and to add insult to the injury the application you want to use does not support keyboard navigation, in such a situation you are left with no choice but to make use of Microsoft Windows built-in MouseKeys utility to control mouse pointer using your keyboard and get important work done. It also helps Programmers or Coders who mostly work on keyboard and approach to Mouse only when it is necessary. With this you can keep your hands on the keyboard to perform both the tasks.

To launch MouseKeys :
  • Goto Start Menu -> Settings -> Control Panel.
  • From Control Panel, Start “Accessibility Options“.
  • Goto Mouse Tab.Check the “Use Mouse Keys” as shown below.
After activating MouseKeys, make sure that the NumLock is on and use the numeric keypad to to control the mouse pointer, use the "5" key to perform left click.

Alternatively, if you are looking for greater control try MouseMan - A free utility to control the mouse pointer with configurable keys on the keyboard, in comparison with MouseKeys MouseMan offers better configuration and smoother mouse movements, the only drawback is that the application is in Swedish but you can configure the application using the English tutorial here.

Bookmark this post:
StumpleUpon Ma.gnolia DiggIt! Del.icio.us Blinklist Yahoo Furl Technorati Simpy Spurl Reddit Google

Subscribe for Daily Updates

Feed Subscribe for Daily Updates Receive Free Updates Through SMS
Subscribe in a Google Subscribe in a Blogline
Add to My Yahoo Add to NewsGator Add to NetVibes

Enter your email address:

Delivered by FeedBurner

Recent Posts on Tech Cram

Find More...

About this blog

Tech Cram is a leading tech blog focused on Latest Technology. Topics cover various categories like Tutorials, Free Softwares, Online Utilities and Latest News.
Visit blogadda.com to discover Indian blogs